There are many interpretations of this type of hearth – deep, hidden, pit, Polynesian. But in common parlance, the Dakota hearth is more familiar. This is a pit in the ground connected with another pit, the walls of which are lined with logs or stones, inside which there is a fire.
Table of Contents
A bit of history
At the beginning of the 19th century, the once large friendly tribe of American Dakota Indians friendly split up into seven communities of Oceti Sakowin – seven fires, most half of which, began to lead a nomadic lifestyle of breeding horses and hunting buffalo. Experiencing constant persecution and oppression from the Americans, who were seizing more and more territory and pushing the once united Dakotas into the steppe. Fragmented communities had to survive in difficult conditions and hide from constant attacks by soldiers. Thats when a new kind of hearth emerged, which was placed underground and kept the tribes name – the Dakota hearth.
Such a fire did not require large quantities of firewood, burned well, did not smoke, and was easily hidden from view if necessary.
The location was chosen under an overhanging rock or the large crown of a tree, helping to hide the fire from above.
This is what the Indians did when they took their herds of horses to the far steppes.
They used hearths for cooking and sleeping in the steppe.
Modern campfire design
The Dakota hearth has not changed much since ancient times, but has become very popular with tourists.
By adopting such a device, the fire is much easier to produce, perhaps not always kept a clear technology, but the principle remains the same.
These are two holes, connected with each other by a small passage, in one of which the hearth is kindled. The second hole serves as an ash pit, from which oxygen flows to the fire, making the flame burn.
It is quite easy to cook food on such a fire, you can leave the fire burning at night without fear, and without additional insulation you can settle down near it for the night. The flames will burn slowly, warming the ground around them.
In such a firebox you can safely leave the smoldering embers for a while, and then, adding fresh wood, build a fire. Such a device is convenient for hunters who leave their couch to go after their prey. After time has passed, returning back, there is no need to build a fire, it is enough to toss some twigs and the flame will be kindled with renewed vigor. Where, without any problem, you can start cooking.
Given that such a construction requires some physical effort, not everyone and not always resort to such a device hearth, though not deservedly.
But first things first.
Where and when it is appropriate
Like any construction, the construction of the main attribute of a tourist – fire takes some time. For this reason, not everyone is burdened with this kind of work. And without the skill, such a device is not everyones strength. But if you dare, it is worth it.
- Because of its safety, this kind of fire arrangement is good for a small tent city, where there are few people and no one to watch the fire. But it is necessary to provide firewood, and the advantage is that it will require much less than an open fire.
- If the need arose not to mark its location for a long time, such a fire not only does not give out, but will be a good companion for cooking and heating. If necessary, it is easy to hide it with earth.
- You can make it in a shelter or even in a tent without worrying about safety.
- The small amount of firewood can also be compensated by the hearth device.
- A strong wind will not allow you to make a fire, it would be a dangerous venture, but not the Dakota hearth, it does not fear the wind, it will burn in any weather.
Such a fire is good during a long fishing or hunting trip, because food can be cooked not only on the surface, but also successfully baked inside. Thats what the Indians used to do.
Pieces of wild buffalo meat were placed on sticks and lowered into the burning hearth, the meat was heated from all sides by the heat and retained all the juices in it. Cooked in this way the game surpassed any expectations of gourmets in its delicious qualities. So cooked fish soup and baked fish on the evening fishing will come in handy.
The best place for a hearth
The best place to build a fire is in rock, where the soil is strong and stable, which not only does not crumble, but also warms up well. Of course, with the arrangement of the hearth in such conditions will have to make a lot of trouble. But even here there is a very acceptable solution: it is enough to find two large stones that are lying at a small distance from each other, after rolling them away, the freed cavities can be used by connecting the underground tunnel. Or lay out of the stones like a hearth.
Just as difficult to build it on the ground with close groundwater and marshy soils, because of the constant filling of any deepening of the water.
It is categorically forbidden to make fires and especially to build underground structures on peat soils and in a dry forest. The emergence of fires in such places is extremely dangerous and it is sometimes impossible to put it out for years.
To summarize, the best soil is the one that allows you to hold shape. Where there is no need to worry about collapse of the connecting channel. These are clay soils that not only hold their shape, they dont let the walls collapse and keep heat well.
Making a Dakota hearth
Moving on to the main thing – the construction of the hearth, it is necessary to have a tool, it is a shovel. In its absence, you can use the sharpened end of any branch. As a last resort, construct a digger from an ordinary tin can, by the way, it can be used as a tunnel between the holes, preliminarily removing both lids.
The principle of the device is the same, it is two pits connected by an isthmus, one should have a pear-shaped deepened form, where the fire is built, the second pit is smaller, it serves as an underblow, allowing air to pass through the channel. There are many variants of the device, lets consider some of them.
It is necessary to dig the main hole, the deeper the better, of course a hole of one meter will not do any good. The optimal depth is half a meter. The pit should be dug in such a way that the neck was as narrow as possible compared to the deepened cavity. The principle of the pitcher is observed.
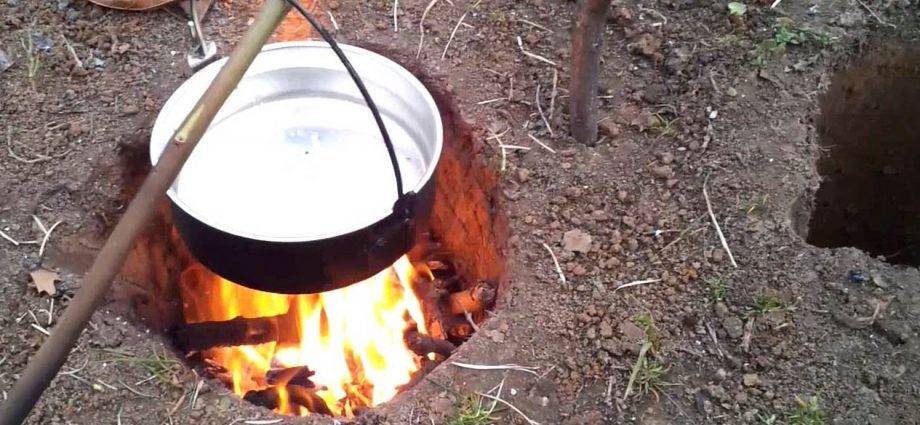
With this arrangement, it is a good idea to place a pot or kettle on the surface for cooking. The walls and bottom are well lined with gathered stones to increase the temperature and duration of heat release.
The second hole is made at a small distance, and it must be dug in compliance with the slope to the first, at a distance of not less than 20 cm, inside we dig a connecting channel that will pass under the ground, connecting the two holes.
If you can not dig a connecting tunnel under the ground, you can do something simpler. Dig a trench to the main hole, cover part of it with a cardboard box, it is better to use a metal sheet, but it is difficult to find in hiking conditions, so we will do with improvised materials.
We fill the cardboard with earth and carefully tamp it, on top you can lay sod for reliability. Such a device will not let the groove collapse and will serve as a good connection. Even if the cardboard burns, the already compacted and burnt soil will not crumble.
Without bothering to make holes and isthmuses, we dig a trench, while respecting the slope, it is good if the topography also contributes to this. Then, the part that is intended for making a fire, we cover with stones or mined bricks, narrowing to the upper base of the opening. The rest of the part, as in the first case, we fix with cardboard or branches, or use empty cans, fill with soil. The fireplace is ready, the only thing left is to make a fire. When you cover the inner walls of the stones, there is a possibility of cracking, thereby can be injured by a fragment of stone flying out, so in this case, you need to be careful and if possible avoid such devices.
This method is more suitable not for field conditions, but for making a hearth on a summer cottage or in a place of permanent rest. In view of the fact that inside the hearth you get special dishes, such devices are increasingly used in the construction of gazebos for recreation, modernizing and making improvements, but the principle remains the same. The pit inside is lined with bricks or serious structures, and then covered with soil, instead of the air ducts are adapted pipes. Such a tandoor is made underground. All these improvements are made for cooking meat and fragrant pastries. There is nothing to compare with your own stove at the site, especially such an exotic shape.
How to use and what you can make
When the hearth is ready, its time to start the long-awaited cooking. There are many ways to do this.
- Using an open fire while the wood is burning is the most effective way to prepare a rich soup or camping porridge. It is enough to hang a kettle on a stick and start cooking. As the coal accumulates you can proceed to cooking meat or fish on skewers, but prudently tackled foil will allow you to bake not only vegetables but also meat on the coals.
- The use of grids or metal sheet, will increase the heating area, then you can use several containers and at the same time cook a single dish, warming kettle. But at the same time it is necessary to keep the possibility of free air movement through the channels. Completely blocking one outlet stops the combustion, due to the lack of oxygen.
- If you are not lazy and have prepared the hearth pit deep enough, then inside with a good amount of coals fit a good piece of meat or chicken, this can be done with a hook or skewers arranged vertically and suspended from a horizontal bar. This arrangement does not allow the product to burn. Thanks to the good heating of the walls and the heat inside, the meat is perfectly baked and you get a terrific dish that everyone should cook and at least once in a lifetime dig dakota hearth.
You can use such a structure not only for cooking, but also for good heating, especially if the hike is scheduled for the cooler fall.
Having built a hearth inside a shelter, of course, it is better to use a tent than a tent, near it you can get warm, having a laying bed in close proximity, without worrying about the flames spilling over onto your clothes. Slow and prolonged combustion will ensure long-lasting warming of the ground.
Advantages and disadvantages
All the advantages of the hearth are described, but summing up we can say that it is the best device for privacy, culinary delights and creation of mystery. This device can also be used in the woods and in the steppe, where making an open fire is extremely dangerous. Another positive aspect of the hearth is the rapid elimination, which is very effective in nature. It is possible to burn all the waste in it and bury it, and such a place will recover much faster than the scorched earth after a huge bonfire.
Like all good things, hearth has flaws:
- A lot of time to make, in the absence of skill, becomes a difficult task;
- not everywhere can be arranged, not all soils are suitable;
- calibrated fuel, small branches and small firewood to be chopped;
- small heating area, does not provide much heat transfer;
- eliminates the possibility of drying laundry and keeping the company warm.
Everyone has a choice about what kind of campfire applies, but in this case: – knowledge is power! So getting into conditions close to extreme with skills and knowledge, you will never be lost.
