- Trophy Ridge Joker
- TRUGLO Red-Dot Crossbow 30Mm 3-Dot Sight
- TRUGLO Carbon XS Xtreme Ultra-Lightweight
- IQ Bowsight Define Range Finding 5
- IQ Bowsight Pro One Archery
- CBE Tactic Hybrid 1-Pin
|
TOP #1

Trophy Ridge Joker hunting bow sight
|
|
TOP #2

TRUGLO Red-Dot Crossbow 30Mm 3-Dot Sight hunting bow sight
|
|
TOP #3

TRUGLO Carbon XS Xtreme Ultra-Lightweight hunting bow sight
|
|
TOP #4

IQ Bowsight Define Range Finding 5 hunting bow sight
|
|
TOP #5

IQ Bowsight Pro One Archery hunting bow sight
|
|
TOP #6

CBE Tactic Hybrid 1-Pin hunting bow sight
|
Table of Contents
Trophy Ridge Joker hunting bow sight
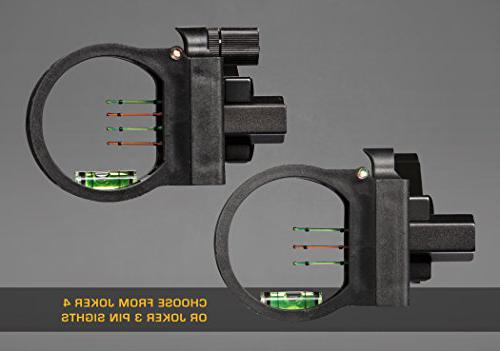
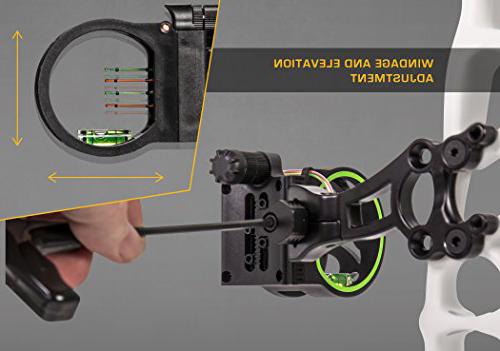
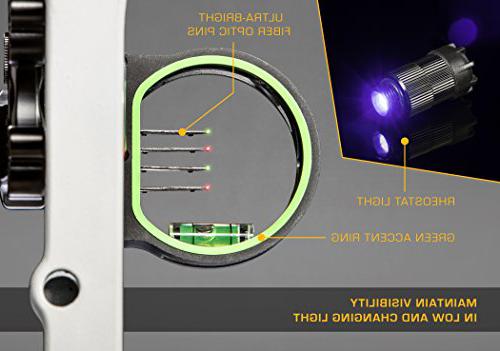
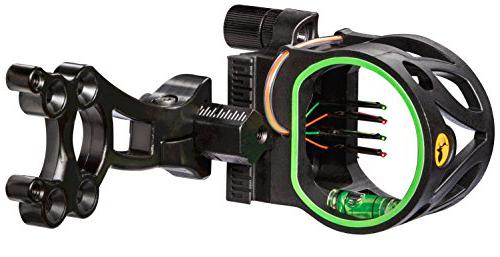
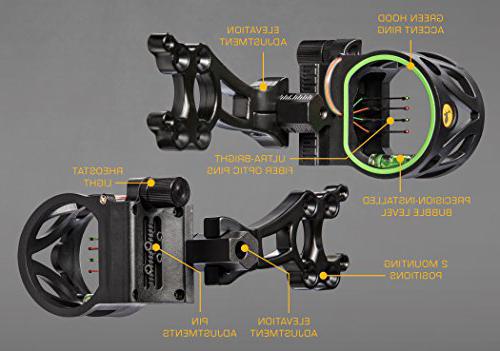
- Four ultra-bright .019” medium horizontal fiber optic pins for ultimate visibility
- Reversible mount design for use with left- and right-hand bows
- Properly align shots with the precision installed bubble level
- Multiple mounting holes for added customizability
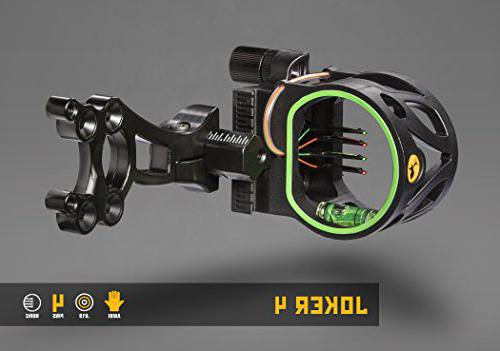
- Green hood accent for quicker sight acquisition
- hunting bow sight
- Brand: Trophy Ridge
- Color: Black
- Style: 4-Pin
- Item Dimensions LxWxH: 1 x 1 x 1 inches
- Sport Type: Hunting
- Item Weight: 0.35 Pounds
- Material: Aluminum
- Type: hunting bow sight

Hey guys welcome back to another textile outdoors video, you follow us on tick tock. He saw that video. He snapped it in half uh because it already was broken before, but we had to rock to walmart. Today we were going to look for a new rod for him. We were also going to stop by our local dunhams and a couple other little mom-and-pop hunting and fishing stores uh just to see if we’d get him a rod this morning and while we’re at walmart.
We saw this these trophy ridge, joker, 4 sites, they’re a 4-pin sight and they also light up. Do you want to show them how that works, and we got them for what we think as a steal at walmart today for 22, which is a pretty good price for a four pin site like us, has a level on everything. So we thought why not, let’s get it. Let’s put on our bows and let’s go shoot the bows today, so cody got his rod.
He got like a loose neon, yellow rod, he’s got it back there put away and uh me and him both got the sights. So today we’re going to be putting on these sites and we’re going to be shooting in our bows and getting these sites ready, so we’re pretty excited uh. This should be fun. We have two targets with us: we’ve got the rangefinder, so everything’s gonna be pretty uh pinpoint today and we’re gonna do our best to get these things cited.
In so hope you guys enjoy the video and we hope you guys learned something and we’ll get right into it. We doubled up all right, hey guys, quick announcement here. As you can see, we got some brand new shirts they’re pretty nice. We just got them yesterday. They got them done there at the shop where uh we’re working with and they’ll be coming out soon. So if you want one hit us up on instagram and we’ll, let you know whenever they come out, they’re only twenty dollars, so not bad price and they’re.
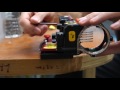
Pretty nice they’re a nice light material, but they’re still made of cotton, so they’ll be coming out soon goodies using the allen wrench right now and getting his sight off first. So we got to get these sights off. We already got his uh quiver thing off, so we got to get these sights off so then we’ll be ready to put in our new ones. Come on they’re, pretty tight, huh mm-hmm, all right, we’ll get back to you when cody starts putting on his new site, all right guys got cody’s in the vise now and he’s starting to screw on those screws.
There get his belt or get his sight on there so looks pretty nice. It’s a big upgrade for cody cody had a kind of as generic of a site as you can get, which is three pick three just three pins. This one came no level. Is that what came? That’s? What came with the belt yeah? I bought a kit with the bevel when I got the bow and I got a discount on that next yeah, but big upgrade for cody.
So sorry I got duty guy, you got anything. I gotta put my my quiver. Oh that’s right! He’s gonna put his quiver on there and then I’ll go right. There cody’s will be set and we’ll go out and start shooting his bow here in a sec after we get mine, done jacob’s working on getting his off he’s got it. What what brand you say, I think that’s too big mine is a fuse fuse. That’s what came that’s the guy before you had right, yeah, so we’re going to get these off if any of you guys are looking for some bow, sights we’ll get some pricing ready and you’re ready to sell them soon, we’ll work on getting this off and putting his new one on and we’ll be ready to shoot all right guys.
I got my bow now in the vise and we’re about to put on the site real, quick, all right, guys, jacob’s, finishing up his site here. We just looked these up online on trophy ridge’s website they retail for 44 99. So we got a. We got a steal here at walmart, 22 bucks. That’s a real good deal, they’re! Really nice sights. I think we’re gonna be happy with them. They light up and they have four pins, so we can sight them in for 50 yards or really whatever we want so we’ll finish up and get the shooting all right guys got our sights on there.
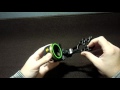
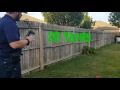
As you can see, they actually look pretty nice because our strings are uh, green and black, so the green on the site actually goes pretty nice with it. So now we’re gonna go outside and we’re gonna start shooting them from 20 and 30 and 40, and I don’t know if we’ll shoot, 50 or not today, but we’ll see we’re just gonna mess with the pins and get them nice and sighted in so we’re gonna go outside and start shooting all right, guys we’re going to shoot the sight for the first time.
This is cody’s first shot yeah new arrows too. We just picked up some new arrows through the mossy oak, arrows from walmart, so he’s shooting over at that at the middle of the target. One I shot low right way low. I think it hit the ground yeah. Let’s get a look all right, so that was like really really low right. It was pretty low, pretty low. So do you want? Do you want to adjust your sight real, quick, yeah I’ll adjust the top one? So I can see what happens.
You always want to chase your arrow. So if I, if I hit low, I want to move yeah you wanna yeah, since he hit low like he said you want to chase your arrow, so he hit low so he’s gonna move that top pin because he’s at 20 yards he’s gonna move that top pin down. So you always follow your arrow. That’s a mistake! Some people make they don’t understand that they move it the opposite way.
So he just moved that down a little bit now, we’re gonna see how that does all right guys second shot here. He adjusted this pin a little bit we’re going to see where it lands yeah. I missed the same spot all right, we’re going to keep messing with this site and then we’ll get back to you when it’s sighted in well guys we didn’t get it on video, but cody just got his 20-yard pin cited in walk up here.
That’s pretty that’s a pretty good group for just starting with it. I mean that’s pretty nice, so uh he can definitely mess with it a little bit, but for today, since we’re doing four pins, that’s probably that’s probably good for his 20 yard. Pin so now I’m gonna mess with my 20 yard, pin all right guys. We think we got jacob’s better sighted in he had a couple shots that were off to the left, so we moved it over to the to the left.
We chased the arrow and he hit one dead center. So it was only one arrow, but he’s going to shoot a group of three here and see what happens. Oh wow, but I think I might not have been spitting that shot there. We go. That’s pretty dead center see how this one is hang on. Let’s go look at it a little low. It’s decent though yeah this uh. This one was my first shot. This is my second shot and then this is my third shot.
That’s a decent group, yeah I’d say we got a pretty well sighed in for today, yeah yeah, we’ll move back to uh 30 30 yards and see if we can get them both sided in all right, guys, cody’s about to shoot first shot from 30. Oh, she hit the target little tad high. Let me shoot another one: go ahead, I’ll shoot! All three cody was messing with his pins a little bit here before he shot it.
So shouldn’t be that far off all right, that’s high too! You don’t need to shoot another one. Let’s go! Look, let’s go look at it and then we’ll adjust. You guys can see on the camera up there by there. So we’re gonna get his bow, adjusted and then it’ll be my turn. All right. Guys, cody’s got it pretty dialed in not like a hundred percent, but you got it pretty down. That’s a decent shot.
You can always tell because the middle’s been shot more. It sounds different yeah, it’s really slack when it’s the outside, that’s another good shot, all right that sounded bad! That’s! What we’re saying is that when you hit the middle, it sounds like a almost like a thump, but when you hit the bad spots, it sounds like a flak, because you see what I did there when I pulled it back, I kind of let it forward a little bit.
I mean that’s, not horrible. He actually just shot a better group than that before that, but I did all right my turn for 30 all right. Here’s jacob’s first shot at 30 yards. We kind of moved his pins a little, so it’s semi-close to mine a little bit high, so left so left and right should be all right, since we did that at 20, you might have just pulled that one that one sounded decent just a little high a little bit.
That’s a bad thought I mean, but it needs to come up. It needs the site, needs to go up a little bit all right, we’ll adjust it here and we’ll get back with you. Whenever we got sighted in all right, here’s jacob’s group, we got a pretty well sighted in here at 30 yards, that’s close! It was hit each other. I heard so you want to go check them out yeah. I definitely tweaked on that last one.
First, two shots were like good shots about good shots. I think we got it pretty well cited in yeah for today. Yeah like we said we’re just getting them decently excited in today and as the off season goes on, we’ll really really get them dialed in, but that’s pretty good. For today, this shot was just me being stupid, so we’re gonna move back to 40 now and keep messing with them all right guys, that’s actually going to conclude today’s video uh.
We forgot to film at 40 yards. We just forgot. It was hot out there and we’re just trying to get all of our shots in uh. It’s pretty much the same as 30 and 20. It was off at first and we followed the arrow we brought it back in. We were just trying to get around that bigger circle in the middle today, as the season goes on or the preseason goes on. I guess we’ll definitely get it dialed in more.
We got plenty of time this summer to get that done, but we’re happy with today just getting it in that big circle and we’re pretty happy with those sights. We thought it was a steal at walmart, so if you’re in local home or has it I’d suggest to go, get it uh, that’s awesome to have those lighted sites for when it’s darker in the afternoons and then early morning, so uh, that’s gonna conclude today’s video and jackson’s been dying to get in videos come over here, jackson, all right! That’s gonna, conclude today’s video and we’ll see you next time on test.
It’s all outdoors.
How’s it going guys, my name is Jason trophy ridge Joker for pin. This is a little site, that’s coming to make waves, mostly because it is very inexpensive, but extremely well made. So these days site, you know, sites are another. One of those things that are just sites are sites. They do their job as long as they’re, durable, yada. Yada, though don’t do don’t do your ride as long as you get something that’s actually worth having, so manufacturers have really started having to step up their game in the lower price points, because that’s where the the real customer base is is a lot of people are looking for inexpensive things that do a good job, and this is an example of just what that brings out when the companies have to step up their game very inexpensive side, but very well made in every way very well machined.
It just looks nice. It’s got very bright, fiber optics. It’s got a good, clear level, plenty of markings that actually they even started, including little satellites that actually go with all their side. Sandwiches just a nice bonus, I mean you, don’t always need it or have to have it, but it’s extremely awesome, when you do have it simple enough, there’s always this little port on this particular size on the top for when it’s in the right handed setting you just screw it into that little port and you don’t have to have it on or anything like that.
It is optional for the states that don’t allow electronics, but when you do want to use it and turn on you just twist, then it shines it a lot into the fiber optics, making everything broader. It’s pretty neat. Let me take you up here to a darker spot here, real quick, so you just turn on and they just they glow. So it’s good at Twilight I mean you definitely not supposed to be punting or anything like that at nighttime.
So obviously, that’s not what it’s for us just to kind of help to help you see when when you need to it’s got a lot of people. Call this a ghost ring, but it is not just to have the outer ring of it lit up like that. This side can be flipped from right-handed shooting to the left-handed shooting, and it’s it’s pretty easy to do. What done haha, so you literally just have to flip it over, which is great everything still functions.
The same everything still just the same. The level does end up on top and that that’s actually there’s some sites where you can just flip the level down, but on this one trophy Ridge has managed to find a tap that is honestly I’m, pretty sure they use industrial grade cement, because you just can’t get that thing off there. It will break every time it is it’s held together better than anything I’ve ever seen in my life, we’ve tried into so many ways to just pop it off and put it down here, but it’s not a good idea, so we recommend just leaving it.
It’s fine, but, like I said, can be either way, so it fits a lot of criteria to the money. I mean it works for anybody and it doesn’t break the bank. So, if you’re, just looking for a good, affordable, dependable, cheap shot, this is definitely the way to go. I mean there’s, definitely more bells and whistles to be had. If you wanted to throw some extra money on the side, but a 4-pin good, durable nice, clear, versatile sides, you can’t beat it so it’s worth looking into.
If this is the kind of thing you’re in the market for all in all, it is just it’s hard to beat for the price point all the pins have their own individual adjustments. Of course, this has got everything that you would need again Manistee trophy or is Joker for, pin.
Hunting bull project, trophy reg, was nice enough to send over five of its react, h5 sights. The react. H5 is in the second tier of trophy ridge, sights falling just below the react. Pro models, this site retails for about one hundred and sixty dollars, which is $100 less than the equivalent pro model, so that $100 savings you’re going to give up third access adjustability, along with all aluminum construction. This site is made of trophy ridges, ballistics copolymer material.
The site also comes with a rheostat light, which comes with fully charged batteries, and now that I’ve set the site up on six different test, bows I figured I’d, show you how I did it before I really get started? I’d like to put this site on the Brightside 3rd access leveler, this site doesn’t have third access adjustability, but when I put it on the bright side, I can make sure the second axis is perfect when it comes to mounting this site on your bow, you’ve got three different mounting options.
You could technically use this fourth one, but that’s supposed to be where you put your quiver and if you do use this, when you need slightly longer screws, so you make sure you’ve got enough threads going into the riser, so you’ve got good purchase with the site once the react. H5 is on your bow, put it targeted at twenty yards and sit in that top pin using the gangue vertical and horizontal adjustments, which are totally toolless once you’re, confident you’re sited in fully at twenty yards, move your target up to 30 and start setting in with the second pin to make adjustments.
Here you need to put the allen key in the top and just make small counterclockwise or clockwise adjustment, and that will move all four bottom pins once you’re sited in at 30 yards. The theory is, you should be just about done, however. I like to double-check things, with the 60-yard pin just to make sure everything is where it’s supposed to be, because all five pins are relying on you being perfect at twenty and thirty yards. I find this can lead to some mistakes.
For me, when I’m shooting at 17 or 21 or 22 yards I find the difference really negligible, no matter what I’m at I’m going to still hit the X. If I’m doing my job, it’s when you get out to 40 or 50 yards that that one or two yard difference really starts to be noticeable once I’m, confident I’ve got things settled in at twenty and thirty yards I’m going to move my target up to sixty yards and really try to settle in that bottom pin. If I’m, hitting a little bit high or a little bit low at sixty I can make a small adjustment here.
Any 30, 40, 50 and 60 are pins, will move just a hair. I can get everything dialed in and if I’m good at 60, I’m good at 30, the 40 and 50 yard pins are always good too. Once that’s done, you and your react. H5 site in your boat are ready to go.
There’s a bathroom great day, we don’t know yet which is bumpy, and it brings me off the back after that made this whole video. But before we start this video I want to give a huge shout out to Jack and Rose outdoors wasn’t commenting back and forth last night on each other’s YouTube channels. Um! Please please, please, please, go and subscribe to him thanks and see you outside gods, checky outdoors in and today I’m going to be doing the review of the trophy Lidge mist sleep insight, full compound, bow, I’m gonna go off the boat, so this is the sight.
I should take. This off did good he’s the site that he comes with a level, so you can tell that you buy those still while you site is Street which needs a fiber-optic site, so this little tube, but he has all the like colder to the wild I guess you could call it that longs to the pins, and then this is the end of it. That’s why it’s lit up like that. The Sun hits this tube thing and makes the ends of it vital. So that’s, but as you can see, because it’s the end of it and there’s your bite so and you can put I didn’t get the one with the light, but you can put the light on here.
I might get a light for it. It just shines into the tubing light then and then makes a pinch, but you can adjust the light. How big you, how late you want the pinched to feel its logo. This also has three screw holes. You can put it any one on your belly like anyone within these two holes, so you can move it back. Follow those if you want to I also have a tofu Lidge, whisker biscuit, it says true. If you were doing it, I don’t know.
If you can see that where does it say I, don’t know eight there you can see. So it also has it like that. So I’m gonna shoot a few eyesight in the back. I sidled it in somewhat already I did not have the allen wrench that fit this so I’m, literally using a scooter that was flathead, screwdrivers. What’s good and also depends on also individually adjustable. Obviously- and it has the then so you can see it circular, so you can sense, it peep sight.
It’s a circle. All right out of sight was square, so nice I’ll shoot a few. You know. Yeah I can just keep it on there. I’m using Easton, Genesis and okay, shot I’ll, go and show you you can see. I was aiming to the side. Where was I? Do the members I did pull down a little bit before I shot I’m gonna shoot another one, try and keep it as straight as possible. Okay shoot another one I’m over here he’s the arm looks like half square.
If you want that just comment, something maybe I’d want something out that was left really like funny and show that when I’m just gonna shoot another one wasn’t terrible, but it was still in the end of name. It does have extremely good cool things coming up on it. There’s my beeping Nathan. So it’s tight, as you can see, I don’t know if they’re touching it all the veins are talking so yeah, it’s good. You know what I’m gonna make that my thumbnail he’ll give me a second here.
I started this video I actually am ending it after I’m done with it. Also so I finished. Oh my gosh, that’s not looking good, so I finished I was my release. This is the next day. I finished outside, so um got some mail. Obviously I lack a member site. It’s a really good site to use it’s the cheapest one I think toy feel it sells so yeah good. So this is cheeky outdoorsy! That’s it I like a member site, especially for the autumn budget like me, because christmas is coming up so I’m, probably then I’m not gonna, say I’m I might get a bow for Christmas Wow, so stay tuned for those videos.
This is janky aldoses and I’ll. See you on the next dimension ceilings.
Sats are a tricky Beast to explain to simply there are so many different ones out there, there’s tons and tons of different variations and different combinations of parts and features that it does it just it’s kind of overwhelming honestly, there’s so much marketing telling you that you can’t get away without having something like a total adjustment or something fancy like a micro adjustment.
You have to have you have to have it, but there’s a lot of things like that out there. So it’s easy to get caught up in it, but the truth is yes, those features do come in handy and they can make life easier for some people. Those part those those types of things are not necessarily for everybody. Actually, there’s a you know, even though those are your can be helpful as those features there’s a lot of people out there that just don’t prefer them, it actually makes their life a little more complicated in their opinion and that’s what’s kind of so cool about it.
That’s why there’s so much room for all those different types of sites, because there are so many different types of shooters and it’s just kind of a matter of finding what you’re comfortable with and what you like. So with that said, I wanted to mention that this is the trophy ridge, vault 5-pin and it is actually pretty impressive site.
As you see it doesn’t have any of the fancy told us. You know micro or just bells and whistles, and anything like that. But it’s that it’s just a very solid, extremely well built very, very bright fiber-optic I mean it’s just it’s just a good sight. So this is the type of site that appeals to the people that don’t need all the fancy stuff.
Yes, it makes it more affordable but, like I’ve said in the past, just because a part doesn’t cost as much or is more affordable or it doesn’t have as many features it does not in any way make it like a beginner part, or you know something that is of less used to you or won’t last as long in a lot of cases, it’s the exact opposite.
So yes, no none of the fancy stuff, but everything else is there is still a site and, at the end of the day, all sides, no matter what they’ve got on them or how expensive or cheap they are. They all act as a reference point. They all have the same primary job. To do so with that said, I wanted to give you guys a closer look at this one, because this is a site that, if you’re looking for something good and see what’s going on, it’s going to be one two most certainly consider like I said straight out of the packaging.
It feels as solid as a briquette. It’s not super heavy, which is heavy enough to just tell you right away that it is just solid, very, very solid. It feels like you can take a hammer to it, not even din it. Another feature. That’s kind of nice is the the housing of it’s actually coated, it’s kind of rubberized.
It’s it’s hard to explain really until you feel it, but they did that to help cut down on vibrations that may make it to the front of the site and I’ve. Also explained this in other videos, when you fire a shot, any energy, if that arrow doesn’t take and carry away from the bow, will scatter into the bow itself, and it will travel to the front most parts of the bow.
So that’s into your stabilizer in sight. Usually so, if vibrations are making it to your site in the front of your of the site housing, they can rattle your pins loops and things like that in time. So having that there anything extra to help prevent that from happening is potentially saving you a big headache down the road if your pins do loosen up and move or something like that, so it’s one of those things you don’t really know is a good idea until you get a chance to check it out and use it, he has a good, very good, clear level on it.
This side is a right-hand or left-hand side as simple as just flipping it now any time. I know something about a product that I can share, even though good or bad I do. But I will say this side. You can technically flip the level from the top to the bottom for lefties, but I wouldn’t recommend if the glue they use is I mean basically industrial grade cement.
It is extremely extremely good glue, so getting that level off will most likely break it. So it’s better just to leave it where it is it being on tops really not a big deal. Honestly. Some people prefer it there and I mean honestly. If it were me, I would kind of prefer it there’s, because I think it’s a better place for it.
That’s up sorted out of the way and a little easier to see. In my opinion, it does come with an optional site light. You can take that on and off there’s some states that don’t allow electronics to be on your bow, so that is completely optional, but earlier I mentioned about how crazy brought the fiber optics are wanted to kind of give you give you a little bit of a show-and-tell on that I am under a lot source here for the video, so all pins the size that I use where I show off will glow a little bit, but the side light is off and those pins are I mean they are just as bright as anything I’ve ever seen before so I mean even compared to other sides that I’ve held on the same light source.
Those pins are way bright and I can actually turn the satellite on. As you see it’s off right now, I could tighten it down and turn the light on watch closely it’s on now. So it doesn’t really look like anything happened right, so they still look just extremely bright and I wanted to show you that, because thickness is still on so I move it up here to the dark and they are still glowing just like they were under the lot, but I turn it off and then go dim again bring it back down.
While it’s off glowing I mean those are bright, fiber optics guys, so that’s crazy and the reason they glow so well is just because I how they got. They got them completely protected as they wrap, but they’re exposed to so they’re, just catching so much light. It’s almost it’s literally like they’re glowing.
I was thinking it’s just crazy, so even without the side light those things are about as bright as they can get. When Twilight comes or low light situations you can always, you know, give it a boost by turning on the side off, but that is something I just got to mention as a standout that that’s kind of wild.
So definitely keep that in mind, but all in all, very well done. I, don’t really I’ve, never heard of anything wrong with I, never had any real complaints about them to share with you. So if you’re in the market for just a good durable, you know site that doesn’t really have all the fancy stuff but doesn’t really need all the fancy stuff, but because it doesn’t have the fancy stuff it’s more affordable and then I would definitely consider it.
It is the trophy ridge, boat 5, pin nothing bad to say about it. It’s just a really good site that won’t break the bank, check it out if you’re the market for a good site and make sure it’s right for you.
Shot this first pin, as you can see, I moved it up a little just to give me room, because it is my pinch and I want to make sure that I had enough work. Flow school I’m going to do is start moving. The entire housing apart right here, you all right so I was actually aiming for. The nine ball hit a little high and right here, I just thought hmmm. Let me try one more time so I reset the camera. Alright, this shot right here aiming first center of the nine ball, obviously hit just a little high to the right.
So almost the same exact spot of the last shot. So I figured that’s good for now again set in a little more precise later on down the road, just kind of want to get general sight and going to do some tinkering later, but these next three shots are going to be all for the a balls on the lower section. So first one is going to be the lower lower right right. There obviously I pulled it because it’s high and to the right next shot is going to be the one to the very left and that one is actually going to be pretty decent shot because I actually took my time.
Patient waited and didn’t pull. You see right there. It is just a little to the right, so not too bad, but this next shot Center 8-ball, you can see. I’ve showed there quite a number of other times. Never had this happen before I will show you in slow mo what exactly happened. You couldn’t figure it out. It did shoot some of the stuffing out and write to the fletchings, okay, so pretty much dead center in for the Met Ball again.
Well, it’s a much hold it pretty good and not going to let those terrible show but I’m not going to edit it up. Alright, so I didn’t edit it out and I’m not going to edit this next regular I should have rested a little longer. I’m not going to make any excuses, should have just waited shouldn’t rush, the shot that’s all but living you learn so make up for later. Alright! So I did take a longer break in between these shots and, as you can see, it is dead center on that ball.
But it’s not the wrong one. Save it for the nine ball. All right aim for the nine ball again and just a little off I feel happy about these two shots in the previous two and you can see from my face when I walk up I feel heavier than the last two all right here. I am back at 30 yards I didn’t think it made sense for me to pull the camera back, to show you me shooting at 30 yards and then walk the camera all the way up, so I just decided to leave the camera down, shoot the shot right here and my 30-yard pen is low and still pretty centered I’m pulling a little more, but not too bad for 30 yards been a while since I’ve shot at 30 yards, so I’m so happy with that and, as you can see, remember up alright.
So back at 30 yards I moved my pin what I thought was in the red direction, but it wasn’t I moved it. The wrong way, not realizing it and as a result, shot lower. What happens when you don’t chase your arrow? Alright, so I moved the pin back where I thought it was before and right there. You can see exactly where it was before and I’m glad it just didn’t hit any of the fletchings or the nock and walk up here realize that I’m back right, where I started square one, making that 30-yard walk back disappointment.
Alright, this is the last shot. It’s going to be centered, but I pulled my shoulders sore been a while since I shot as many arrows. Thank you for watching like this video subscribe. If you want to see more got some more stuff coming up soon,.
Hey guys welcome back to can outdoors um, I haven’t made a video in a while, because I’ve been very busy. I changed jobs and uh did a squirrel hunt this morning, um my wife just cooked a bunch of squirrel. Apparently my kids love it so uh yeah she cooked up five of them. I know this. This is gonna, be changing the color and stuff because of the I’m shooting it on my camera and I’m outside. So hopefully it’s not too bad. Hopefully the wind’s, not too bad. It is windy out today, but I’m going to shoot this thing and get this new 4-pin sight sighted.
In I debated for a while what I was gonna do with them. I decided on the top pin being 15 yards and then 10 yards 10 yard increments. After that, so it’ll be 15, 25, 35 and 45. That’s what I decided on so mainly. I got to get the top pin sighted in because for sighting in the top pin your first one you’re going to be moving the entire housing up and down left and right until you get your top pin sighted in at 15 yards or 20. If that’s what you’re doing, but I’m going with 15 and then after that, these see, if I can get closer where the pins are, there’s a little allen screw loosen that up and you can move each individual pin up and down by using those, so you’re gonna once you sight it in for the first one you’re to keep that first, one, the top one tight you’re going to keep it where it is, then you’re going to move each one of these pins up or down until your elevation for those is right, your windage or left and right should stay the same.
If it doesn’t, then you have a bow tuning problem. You have to deal with, maybe you’re. You have to adjust your rest, but I’ve already shot this a whole bunch. I’ve got the tuning absolutely perfect. The arrows are coming out absolutely straight. They hit the target they stay in there straight. My groupings are perfect, so well as close to perfect as I get you know, I’m new to this. I did extend this. It was a short little one like this long. I pretty much doubled it and it works a whole lot better for stabilizing my shots.
Um when I, when I go to site this in I’m gonna use the camera in this right. Now, it’s empty, there’s no camera in it, but I’m gonna put the camera in there and shoot it with that. So I’ll be testing this at the same time that I’m sighting in, hopefully it works good, I’m expecting it to wobble back and forth as I’m holding the bow. So when I’m holding the bow out there at full length, there’s an ever so slight wobble I mean you couldn’t even tell, but with that camera all the way out there on the end, it’s probably gonna go like this, I’m okay with that, as long as it looks good, so hopefully it looks good because I would really like to be able to take you guys on hunts with me and use this so that you’re, seeing what the bow is aimed at the entire time.
I’m also going to, of course, have a second camera with me. Probably in my tree stand or ground blind or whatever I’m using, so you guys can see me as well, and the audio on this is terrible, especially when you put it in this waterproof case. The only thing you’re going to hear out of that might be a little bit of wind noise and probably the bow going off. It’s probably going to be kind of loud, because when that string hits that thing it’s going to vibrate the camera and it’s going to make some noise, but I’m still loving this bow.
I love it. It is absolutely incredible: my groups are tight, they’re really tight, but I haven’t been sighting it in I’ve. Just been I’ve been shooting groups to make sure that all my tuning is right to make sure that I have. I don’t have to worry about the top and the bottom being tuned together so much because these are actually all the way tight. So it’s not going to throw it off by much. I know there are some things that you can do in these that I’m not going to worry with, because it’s honestly guys it’s it’s tuned very, very well, and I had to do all that on my own, so it took quite a while to do it.
I’ve been shooting a lot and I’m going to record it. Of course, on this see what it looks like, and hopefully it looks good and hopefully we can get it cited in pretty quick, because I don’t want to make this video too long. So that’s what we’re gonna go do right now, uh uh, um uh! Well guys. I hope you enjoyed this video, don’t forget to like comment and subscribe, and I will see you guys in the next. One have a good day.
TRUGLO Red-Dot Crossbow 30Mm 3-Dot Sight hunting bow sight
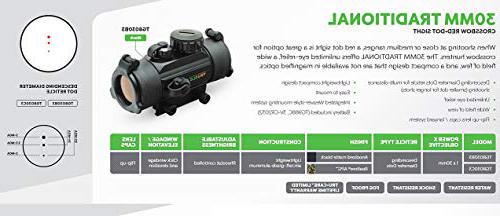
The TRUGLO Red-Dot sight has a 5 MOA reticle designed for quick acquisition. Dual-color reticle illumination (red and green). Includes an integral saddle mount for Remington 12 ga. shotguns. Machined from a one-piece extrusion. Shock resistant to 1000g. Waterproof / fog-proof. Unlimited eye relief. Wide field of view. BONUS! See-thru / flip-up lens caps, optical-quality / all-weather. Adjustable rheostat for brightness control. Lightweight / easy to mount. Multi-coated lenses produce more than 95 percent light transmittance. Special anti-reflective interior eliminates stray light from appearing inside the sight. Click windage and elevation adjustments. BONUS! Integrated lanyard system prevents loss of screw-down W/E caps. Integrated Weaver-style mounting system. Battery included (3V-CR2032). Ideal for shotguns, handguns, rifles, muzzleloaders, paintball and crossbows. Lifetime Limited Warranty.
- Package Dimensions: 1 x 1 x 1 inches; 1 Pounds
- Item model number: TG80
- Manufacturer: TruGlo
- Type: hunting bow sight


Finest outdoorsman rely on true blow to fuel their passion. The true glow, crossbow, red dot sight, provides all the innovation you’ve come to expect from true glows red dot series acquire your target with speed and precision using the three dot crossbow reticle for any lighting situation. Reticle brightness can be fully controlled with an adjustable rheostat. The crossbow red dot sight features a wide field of view and unlimited eye relief, click, windage and elevation.
Adjustments are right at your fingertips and the multi coated lenses H stray light while providing maximum brightness clarity and contrast thanks to its all-weather construction. The true Glo, crossbow red dot sight allows you to stay worryfree in bad weather. It’s waterproof fog, proof and features a see-through, flip-up optical quality lens cap. True glow dependability, allows you to pursue your passion without worrying about your gear.
The crossbow red dot sight is lightweight shock, resistant and backed by true glows limited lifetime. Warranty the true Glo, crossbow red dot, sight fuel, your passion with true glow.
The 4 by 32 scope that was on here and we replaced it with the true glow, dual color red dot right there. Now this was originally 69. Then it went down to 59 and I got it for 39 bucks so out with the old and in with the new got a red and green dot on it, which I’ll show you. Here’s the rifle right here, I just I’m trying to do it on the tripod, because I feel the Roy don’t feel like holding the camera, but it looks pretty damn sweet.
It’s got the out dust protectors on it, but you can look at the red dot or green dot through the covers, and it just distorts the color just a wee little bit. I, don’t know if we’ll be able to pick that up, I’m trying can’t see through the viewfinder. If you could see the red dot. Let me take things up, but anyways these just pop up they’re, not really that uh.
You know they worked put it that way, see if you can see that dot I don’t know. If you guys can see it. Oh yeah right there you see it so that’s sleeve and I, really like it and it’s smaller than that big scope that was on her and I was starting on bucks and I was able to keep a trail check it out. So it’s just and I got to travel the tunnel right there.
If you want to use the irons I’m really digging it, so you can see the green dot. Let me show you the red one, and it’s got quick access to to where, if you set it right as soon as you turn it on it’ll come on full brightness of whatever color that you want all right, where’s, red, I, see, I, don’t see the red one is good I’m trying, not hair is right there, so that’s sweet I like it and it should be a cinch to zero, because right here is your elevation and then on the other side.
Right here is your windage, so that will be simple as hell to sight in that’s for sure and I like it, because it now it’s on red. Okay. So if I just turn it off one click, it goes right off. Okay, so if I want to turn it on boom, it’ll be on red, but if I can’t turn it and then I turn it on boom, it’ll be on green and I, like the green dot see if we can find that dawn again, where’d it go right there.
So that’s pretty sweet, I’m, really, really digging it. So I can’t get to the way to get it arranged and touched it out again. It’s the true globe what the hell I do with the package. It’s over here really digging this SKS, that’s for sure and get it to stand up. We’re not falling over I’ll, be taking it long. So it’s the 30 millimeter objective lens 44 percent, more viewing area than 25 millimeter models and it’s great man.
It works for rifles, muzzle loaders, paintballs, crossbows, handguns and shotguns, so I’m bigging it and for 39 bucks. The price was right: beeyotch re-enters, looking from your Marvel’s with the red dot and green dot, scoped SKS lighter.
Hey guys shoot the day again with the Ruger 10/22, just I hear plink enjoin this pretty day. Well, if you can see downrange, there got a couple of clay pigeons on the big target they’re on tops of the post kind of towards the tops and got three clay pigeons on the t-post there, or about about 40 yards away using the true glow red dot, scope, dialed in pretty good list and we’re going to see if we can take them clay pigeons out they’re a lot of fun to shoot. You get instant feedback. So, let’s see, if we take a few of those out, it was long push the hole right in and that one on the right didn’t fall.
Try it again! Can we finish him off danger, a lot of fun to shoot. I’ll be right back, alright, guys going to move in a little bit closer. This time got a hint clay pigeons up. There got ten rounds in the rotary magazine, so 10 rounds 10 targets. Let’s see how good we can do I’m not going to be as far back this time, probably about 25 yards, but I, don’t care how good a marksman you are when you turn that camera on some of you guys have made videos know what I’m talking about pressures on so like they 10 rounds 10 target.
Let’s see what we can do to running in the hole, just let the holes in the dev good, alright, alright, guys, I appreciate it. I’ll be back just a second I’ve had some PM’s about this true globe, read daughter by zesting what kind of red dot did you have on that thing? Guess my Christmas video everybody was asking what kind of red dot that was, so it’s a true globe, one more special I’ll be back! Just second give you a closer look at it. Hey guys! Won’t let you guys get a look at the red dot scope on shoes and I told as I said, it’s a true glove GGC, true little red dot bought at Walmart, very inexpensive I’ve, had it for several years, I believe I’m, pretty sure I paid under $30 for it.
But man I know I’ll, probably get some messages about. You know this thing’s a piece of junk whatever, but uh no complaints, man, it’s been a great little red dot, I mean I, don’t know how it hold up so I. You know heavy caliber guns with recoil shotgun things like that. But far as of 22 goes on the on the Ruger 10/22. Here it’s a perfect man and it’s like say it’s kept at zero, no complaints whatsoever. You can see it’s got eleven brightness settings there, 1 1 to 11. It’s plenty bright for daytime I’m out here, shooting in the Sun bright Sun.
Today no problems in it whatsoever. As you can see there, it’s got a knobs for windage and elevation adjustment, flip up lens caps. Very nice protect your unions. There see if I can turn it on. Let you see it it’s about a 3 or 4 MOA dot. It’s thisis, very good size dot, well see if we can get get it here. If you can see it there. Oh there it is. You can see that or not, but okay, that’s plenty! Plenty bright enough! Good red dot. I said no complaints. This bad boys had held it zero for all these years, so I say for the guys for the money I recommend it I mean I mean I, wouldn’t I, probably wouldn’t put it on my AR, but for a Ruger 10/22, if you like, just the red dot stuff without magnification, good little scope, man, so anyways guys, I appreciate it.
Thanks for watching.
Hey guys welcome back to another episode sight in a crossbow coming right up. Aren’t you guys welcome y’all back drops all the previous videos. We did the unboxing of the Barnett jackal crossbow, you guys haven’t seen it check it out, check out the specs on this thing. Um I went ahead and put on the noise stepping kit, so I can see. The limbs basically says rubber the absorbs the shock and kind of quiet it down a little bit. That’s a little slider rubber there.
Anyway, we are out here about to shoot it get a side in the air. Now, when you got this light needed crossbows first of all, another expert across roads, but uh when you guys first put this sight on the easiest thing to do is to put a boat in get a [ __ ] flow to put a boat in and adjust that red dot boy, every diet, whatever color, is adjust it to where it is floating just above the boat, where you see that and then we’ll fight suited after that, so I hate an idea that I got this where it’s hidden on the target.
It’s just not hitting exactly where I wanted it hit a little hot and right. Let’s tell you want to fine-tune it. Show you guys how to do that. You wanna get you guys a flathead, screwdriver people say you get supporters whatever, but uh you gonna adjust your you’re gonna be adjust this, so you want to use something. That’s real flat. The top here is gonna, be adjusting your up and down and then the side adjustments gonna be for your left and right.
So basically, you want to go ahead and get it hitting where you want to hear that high and low and then adjust it to where it’s left and right and towards hitting on the bullseye I. Have the target set up I’ll show you guys in a second I, have set up at 10 yards 20 yards in 30 yards you’re at 3, dots, I cited, you know 10 yards when yards 30 yards. Let’s go all right. You guys the jaw can see you got a target set up a suitable type of cooler. Now that tree is a thick.
My tape, measure and I measured it in a tree, is 10 yards from my student platform and if you see right there that first post the first post is 20 yards and then that last post right over there is right at 30 yards, so 30 yards pretty far. It’s a lot further than you guys think, but it’s not part for crossbows I’m signing in here. First, it’s here will pop out to 20 in the after 30 make sure you guys have a good backstop I. Have my neighbor’s backyard.
It’s backstop because uh I, don’t like their dog I’m, just kidding haha anyway big tree in the backyard big oak tree. It’s not stopping his arrow goes crazy but, like I said, I already have it to where it’s hitting on the bag, so I have I. Don’t foresee it missing that much at this close range anyway, let’s go ahead and yeah crossbow cut and load it and then we’ll take our first shot see how far we are off the mark. Alright, guys as I can see the first shot.
That’s the first shot at that hit a little bit right, but those two hit pretty consistently a little little high and little right of where’s Amy I was aiming top dot was centered on the green right there. So did a little bit left. Actually, a lot left maybe inch and a half two inches to the left, and then they go down. Maybe two inches all right. You guys go ahead side again, top it’s gonna, be our lifting left and right, and on this one in particular, or a top some be our up and down on this particular at twist clockwise, that’s to the right make go up and then the opposite way to make it go down.
So we’re making go down. A few clicks. I just do intervals of 5, let’s start off with just 5 flicks left or right, whatever it may be up or down 5 clicks and then you’d be more five more that kind of go by 5. This one left it’s going to be counterclockwise right, clockwise, so I’m going to go, left, 5, flicks and ill say it speaks perfectly in there and it’s a real thrill roads out on precisely so made those adjustments we’re going to recopy it reshoot see where it you did like I.
Don’t know popping with me 30 terms and is I can see the reticle moving over so money. That’s money, I! Think! That’s guys outside that shot. It hit like a hair. Low I mean I’m talking about like half in a quarter of an inch. Let’s go ahead and download up, get it right on target right, zero, all right, six clicks higher and we’re hitting right above the center. So you guys like to see a video where I split two arrows. This is gonna, be it right here, get it in routes heights.
You can see, see the magic happen, I’m about to try to split, not split. It it’d be perfect perfectly that in so that no one missed this, and there we have y’all saw happen, live EP outdoors, not so alive, y’all, so happy, pretty dang good I just got some that were dialed in at 30. All right at 10 yards moves back out to 20 will shoot, see we’re hitting at 20 and then after 30. So here we go just like it’s a little high at 30, but we’re sitting in the bag can’t see for now, but wet move down there in second, take a look we’re out to shoot this third, a truck or boat.
All right, I thought that one hit a little bit to the left a little bit hot. Here we are see a 30 arcs. It is a little bit hot and they left her. Why? That’s just me still pretty consistent I mean if I’m shooting at a deer, that grouping right there, but still hit the heart and that bag is obviously being Spears body come on wrong with it. Take it over that burn all the way back over there. Some shooting platform now made knowing my spot, knowing my setup.
I, probably shooting from 20. To be honest, that’s probably why I pick my shot from from where my feeders at so for my sake, 20 yards hitting like that I mean I’m, hit the bottle so I’m hitting hard time hitting long I’m. Alright, with that, for the sake of this video I’m gonna head back up to 30 we’re shooting again, he was hitting at 30. You guys saw at 10 is dead-on at 20, it’s a little bit high, maybe in China, and then that’s on the second reticle and then 30, we’ll see with the bottom reticle will see what 30 is hitting up ouch guys.
This is where I worried about all right. My eyesight’s not two bits all right: I, don’t work glasses when I go hunting because it I thought get the strokes in my vision. That sounds kind of crazy, but you know I can’t see my left and right as well anyway. My only problem is at 30 yards, aiming at that little green dot and me that’s a pretty tough shot for me because the further out things get the blurrier they get for my eyesight, but as long as I’m hitting somewhere within those four targets.
The spoiler dots I’m. Okay with that because, like I said, that is a deer as long. That’s that’s that’s the bottles definite! If, if nothing else, it’s gonna be the liver either way give me a kill shot so I’m going to back up, take that shot a 30 and then after the shot at 30 I want to yeah I’ll be happy with it. Aren’t you guys, y’all just saw that happen right all right, not planned at all I ain’t high, because you know Kobe hit and worsened to me and went over the bag hit this posts a hip hot.
Oh, you know, barely get that post I mean if that was a little bit higher, that wasn’t went clean over so huh – back up right. It’s just inside man, that’s like what I’m traces and literally scan the top of the bag. It had to have that I mean I’ve, got nothing papa bad can’t make yourself up y’all, literally load top of the bag. What this tells me is the further out again using those high running foots, then I can hit higher or it makes them hit way higher, so we’re gonna do is I’m.
Leave that right there just like that, but back up I mean use the top reticle at 30 yards all right. Let’s guys take a walk with me all right, sinner dot. You all right now confuse the head down into ten type dot at twenty. Second I hit a little high that thirty bottom dot to high-top dot to low center dot a little bit high. So maybe this scope is rated for 20 for the top dot 30 for the second dot and then maybe 40 for the bottom dot. So we’re backtrack a little bit, we’re back up to 20 yards and shoot 20 yards with a top dot and see what we get like I said at 20 yards I’m: okay, that’s still hidden bottles! That’s that’s! A two inch spray at 20 yards all right next episode.
Your next step, I, want to shoot this bag from up in the tree. Practice makes perfect. Perfect practice makes perfect. You want to practice the way you’ll play and I’m not gonna, be shooting horizontally, I’m, just shooting from a tree. So you see I have all these trees in my backyard the shoes from this one here, it’s one being up there somewhere about 25, let’s see if I put up there at the country, so I mean for more I’m. Show you guys how to set up a lock own tree stand the easy way show you guys the assembly, the new lock own.
She got I set your tree up and then the third part would be shooting this bag from that tree, and you guys see the difference in the handles and see difference in the distance. You know, 20 yards flat is 20 yards, but 20 yards from 25 foot in the tree. It’s a big difference all right, so I’ll show you guys that next episode, that’s if now you guys think I’m for tuning in watching and hope y’all are stopped. If not, hopefully, I was entertaining for you.
That’s it from EDI doors, y’all stay tuned for more to come. Ii do.
TRUGLO Carbon XS Xtreme Ultra-Lightweight hunting bow sight
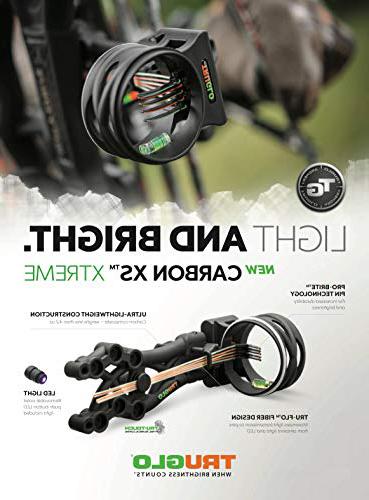
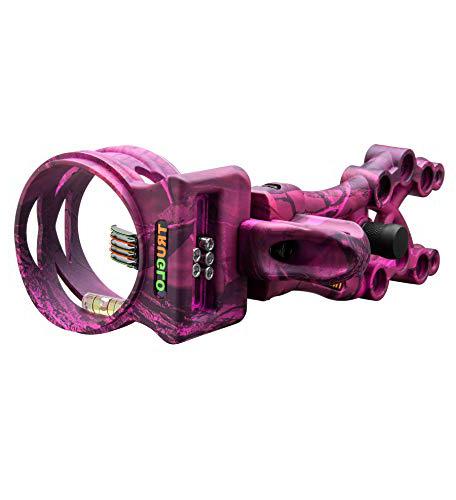
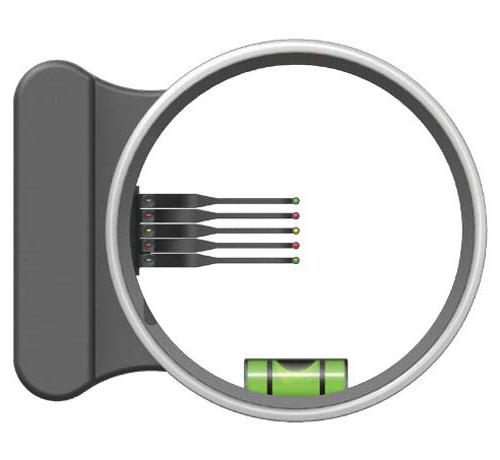
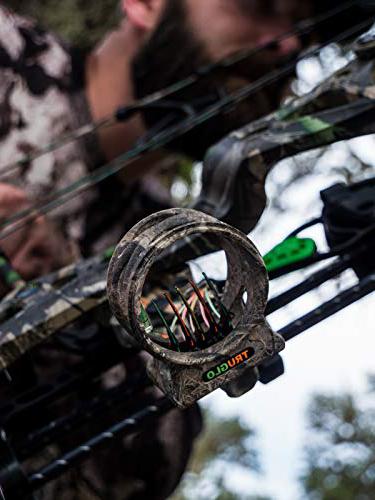
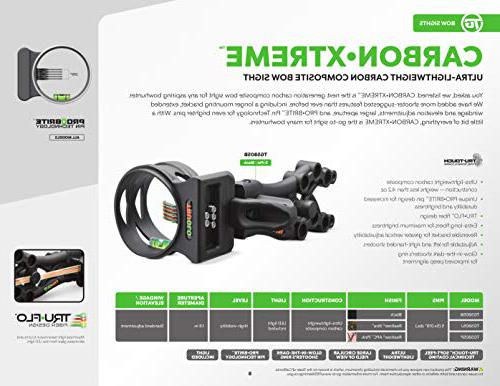
You asked, we listened. Carbon XS Xtreme is the next generation carbon-composite bow sight for any aspiring bowhunter. We have added more shooter-suggested features than ever before, including a longer mounting bracket, extended windage and elevation adjustments, larger aperture and PRO-BRITE pin technology for even brighter pins. With a little bit of everything, Carbon XS Xtreme is the go-to sight for any bowhunter, at any skill level!
- Ultra-lightweight carbon-composite construction; Weighs less than 4. 2 ounces
- Unique Pro-Brite pin design for increased durability and brightness
- TRU-FLO fiber design maximizes light transmission to pins and eliminates glare from the LED light; Extra-long fibers for maximum brightness
- Reversible bracket for greater vertical adjustability; Adjustable for left- and right-handed shooters
- Glow-in-the-dark shooter’s ring for improved peep alignment; Includes removable push-button LED sight light
- Sport type: hunting
- hunting bow sight
- Manufacturer: Kinsey’s Archery
- Brand: TRUGLO
- Color: Realtree APC Pink Camo
- Item Dimensions LxWxH: 6.5 x 3.75 x 2 inches
- Sport Type: Hunting
- Item Weight: 7.2 Ounces
- Material: Carbon Fiber
- Type: hunting bow sight


Hey I’m plenty from true glow here at the ACA show. We’ve got all kinds of new products this year, one of which is our new carbon access. Xtreme site, the carbon access has been a popular site for us with all kinds of dealers. It’s been a popular site for quite a while, and people are just loving it, but we took some extra time to add to it a little bit we created a longer sight, radius, longer fibers for increased brightness and we’re using our new pin design, uses our new probe right pins, which are all stainless steel and their flat design pins.
So it gives you a little extra strength and rigidity without complicating your sight picture, so that’s the carbon excess which everybody loves and the brand new carbon excess extreme street price on. These is probably gonna, be about thirty nine dollars for this one and about forty nine dollars for this one and they’re both available in all kinds of camo patterns as well as black. If you want more info just visit.
Hi I’m plenty from true glow and today we’re looking at the carbon excess extreme site. Our carbon excess was our most popular site for quite a while and we’ve upgraded that site to the new extreme version. So the carbon excess Xtreme has fully coated fibers running the full length of the site. Extra-Long fibers mean more brightness they’re covered, except on the outside, where that allows it to pick up more light from your target end.
Our flat pin design is incredibly strong, you’re not going to bend a pin, but it also allows you to look through your site in a way. That’s not going to obscure your target in this site. It’s also made of a carbon composite, so it’s incredibly lightweight and it lays weighs less than five point five ounces. It comes with a light. It comes with a level and it comes with glow-in-the-dark sight tape so for bow hunters and shooters who are either just getting started or intermediate level hunters.
This is one of the best options out on the market in terms of getting the absolute most amount of features for your money. If you want to learn more, our website is true: glow com.
You planned the perfect hunt now get the site and quiver by true glow. This ultra lightweight duo is made of a durable carbon composite construction, that carbon site weighs less than three and a half ounces with precision adjustability and the carbon Quivers positive, cam, lock mounting system is ideal for smooth one-handed adjustments. Both have the true touch soft, feel technical coating and are available in your favorite camo pattern.
The perfect light weight gear for the perfect hunt, true glow.
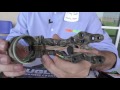
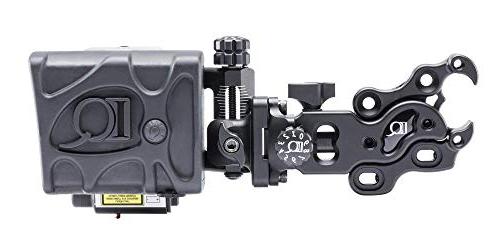
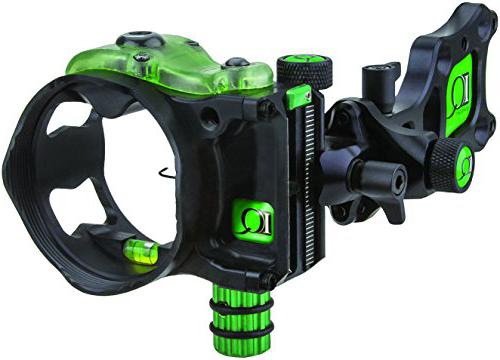
IQ Bowsight Define Range Finding 5 hunting bow sight
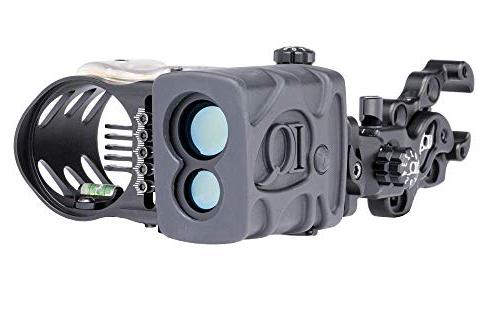
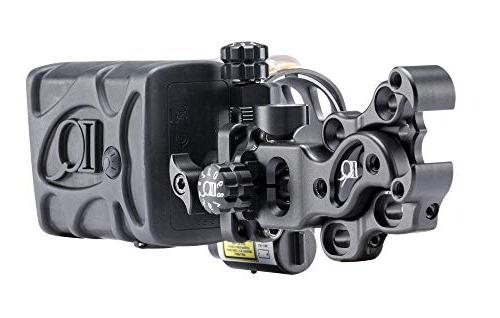
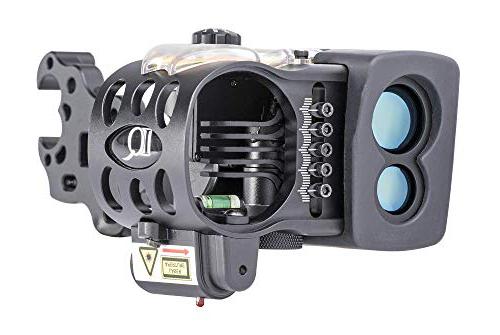
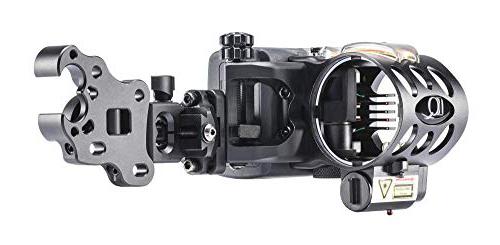
- RANGEFINDER BUILT IN – Put away your handheld rangefinder during bow season and stay ready to shoot with the Define Range finding 5-Pin Bow Sight. Accurate up to 99 yards away
- EASY TO SET UP, EASY TO READ – System activates rangefinder with the push of a button trigger with adhesive backing for an easy placement spot on your bow. The easy-to-read, blue OLED display with yellow battery indicator has a 2 minute scan mode
- BUILT IN LIGHT – Illuminated by a built-in light with 4 brightness settings, the Definer’s pins feature tool-free wind age and elevation adjustment that lock in with tool-free locking knobs
- LONG RANGE ACCURACY – 2nd- and 3rd-axis adjustment boost longer range accuracy. Definer’s integrated rangefinder gives bow hunters true, angle-compensated yardage on targets as they sight in with the sight’s five . 019″ pins
- RED DOT LASER – Comes with removable red dot laser for pin calibration. Dual mounting options allows you to mount your sight to your particular shooting style. CR2 battery included. Left hand.
- hunting bow sight
- Manufacturer: IQ
- Brand: IQ
- Color: Black
- Item Dimensions LxWxH: 9.5 x 4.75 x 6 inches
- Sport Type: Hunting, Archery
- Material: Other
- Type: hunting bow sight
Hey everyone: it’s Ryan from IQ, both define rate range, finding site the range finding site, packed full of features. The purpose of this video is to talk. You start to finish from your purchase through opening it making sure you have all the appropriate hardware setup or excuse me mounting then setup and then how they this will function for you. So first things. First, you purchased your boa site, congratulations and now getting into it as we open this up every cover and then once you flip it upside down.
You’ll slide off this sleeve and underneath you’ll find quite a few objects. You’ll have your target here and you’ll use this target in order to to zero in your range finding site so that you’re, visible laser and you’re 20-yard pin are in the same location. You have your instructions, make sure you read these, because this will talk to you start to finish. If you don’t pick something up in the video, then this will give you the finite details of it. You have your trigger assembly, your mounting hardware, your allen keys, and then you have your attachment means to attach your trigger to your riser.
So first things. First, we’re gonna grab the allen key and we’re gonna get this sight out of the packaging so attached with fasteners on the backside, some socket head cap screws and then once we get these off, we’ll just set these off to the side, because we won’t need these while we’re melting the side. So now we have the site so first things. First, once you get the site out of the packaging, there is the battery cover back here on the battery cover you’ll open this up and you’ll remove the insulator that protects the battery from from turning on or being engaged while shipping.
So you unscrew this you’ll take off that insulating cap and then you’ll just screw this back on we’ll do the same thing under here under the battery supply. This is the battery supply and you’ll open this up again, you’ll take the insulator off and then you’ll screw this back down. So once you do that check to make sure everything is operational. Button on the bottom of it turns on the red laser. You can see that there’s now a visible laser projected that’s critical during the setup of your sight.
Additionally, there’s a port on the bottom of it, this port and the trigger, as you plug this in engaging the trigger one time. That’ll show that you have illumination on your your range-finding site, so just to make sure that everything is functional and correct, hold the trigger down to turn it off and then we’ll start the mounting process. So in your fasteners to mount it, you have two different types of fasteners. You have a socket head cap screw you have a lock washer and then you have a washer, so socket head cap screw put your lock washer on put your washer on and then set that down.
Additionally, you have another fastener and clearly it is different flat top. So when we’re mounting the book the sight to the bow, this one goes in the top mounting hole. The socket head goes in the bottom mounting hole. This is absolutely critical during your setup phase, as you have to adjust the orientation of your sight. This will allow you to do pivot motion, so we’ll set these down, find the appropriate allen key good to go for the top good to go for the bottom, so taking your riser. Obviously you have your site mounting holes now, as we do it we’ll go through and again.
This one goes on top good feature to take a look at as you can see that this has a a shape to it. It is it matches the the concave to the upper mounting portion so as we do it we’ll get it aligned and then we’ll start to mount it just mount it enough, so that it’s hand snug and then we’ll do the same thing on the bottom, as we do the bottom again make sure that you have your washer and your lock in there, your lock, washer and again snug. So the purpose of this is that, as you go through, the setup of the site, you’ll have to make some adjustments to be able to adjust the pitch of the projected laser itself so that it gets in line so that when you’re at draw and you’ve used, your 20-yard pin to sight in then you’ll be able to walk the laser on to the target so they’re using the provided target.
So it’ll give you the correct orientation between your 20-yard pin and your projected laser. So again, like I, said: snug not tight, understand where you want to mount your trigger assembly. Generally speaking, the front of the riser is probably the best place to do it. So when you’re at draw, you can engage the trigger. So taking your your velcro tape, we’ll take one of the sides and will adhere it to the front of the riser. Taking the other side of it, you’ll be able to use the mating side and we’ll put that mating side on the backside of the trigger assembly in the packaging.
There’s an additional means to adhere the trigger to your bow, which is two-sided tape. A two-sided tape is for, if you put it on and don’t plan on taking it back off for the trigger assembly. So if you don’t want velcro, you don’t have to use velcro. You can use a two-sided tape. Is your option so taking this attaching so then you’ll go back through all generally. What we like to do is just wrap it around once just so it stays up and out of the way and then you’ll plug it into the port. You know how you choose to wrap this.
Your means of doing it is totally up to your preference and how you want your setup to be so now that we have it mounted, making sure that it’s you’ll use pressure to push it down and what that’ll do is that’ll pivot it. So the first step in the setup portion now that we have this mounted the first step in the setup portion, is that you’re gonna take these your fasteners and you’re gonna cinch them down so as we cinch them down. That’s just so that there’s no movement undershot will get this, get this nice and snot snug and then you’ll go through just like any standard site setup portion.
So what you’ll do is you know at draw? You shoot at twenty yards. You use your top pin to use as your your 20 yard, pin, obviously, and then you’ll use these tool free, windage and elevation, adjusters and you’ll be able to you, know, standard site, setup you’ll follow your arrow. So if your arrows shooting high you’ll click and you’ll take your you know, you’ll take your your site up if you’re shooting to the right. You know, you’ll move your site to the right. Once you get your your 20 yard, pin dialed in for your setup, make sure that you lock these back down and then you’ll go through and you’ll turn your visible laser on.
So we engage our visible laser and I’m gonna set this down for a second, so I can open up the target. So I can talk to you a little bit about the target, so the target are the sight in paper. Clearly, it shows here that you have your 20-yard pin and then you have your projected laser, so the distance between the center of this and the center of this is also the same distance between roughly between your 20-yard pin and your projected laser, so at 20 yards. What you want to see is your 20-yard, pin and centered here, and you want to see your projected laser that is hitting this this surface here, so go down at 20 yards, hang your target and then we’ll start the actual sighted process.
Once you have your your 20 yard, pin done, which is which you, which is what you’ve done now you’ve hung your target you’re, going to start going through and you’re gonna look at where your laser is projected in relation to you holding your 20 yards, pin on the 20 yard and target, and so if the laser is left or if the laser is right. First things that we have to do. There are two set screws on the side of the site, and these two set screws allow you to pivot the beau-site which will walk your laser, either left or right to get it in line so that it is in a vertical line, with your 20 yard, pin so using the appropriate there.
We go so as because it’s a pivot pin. So as you loosen the pin one way it allows you to drive this pin in and you’ll start pivoting the sight so left right and that’s the process and you’ll continue to do it. So, each time that you make an adjustment, what you need to do is knock an arrow in a safe direction. At your twenty yard target draw your bow and then once you draw your bow, you’ll look at your twenty yard, pin and then you’ll look at where your laser is in reference to that. This will probably take a couple iterations, depending on the adjustments that you’re making, but that’s to make sure that again that your laser, your projected laser, is in line with your vertical pins, once you’ve done, that you’ll go back and you’ll loosen up the set screws on the side.
So, as you loosen this up, you’ll loosen this up just enough, so that you can get some movement in the sight and so that movement was there. This one is tight enough so that it it still provides some resistance so that little change won’t be a Groce change at at twenty yards on the back of the site. There is a set screw in the back, and so this set screw here is to be able to micro, adjust your vertical, and so again, as with your left and right, the goal is to get the 20 yard pin on the target and your projected laser so that your projected laser is here now.
If your twenty yard pin is here and your projected laser, is you know above it, obviously that you’re going to have to make the adjustment in order to pull that site down and so pulling the site down? You know it’ll, allow you to excuse me. It’ll it’ll, allow you to elevate this downer position this so that the laser comes down, and then what you want to do is each time you do that you want to take this set screw and you just want to walk it up to the back of the fastener, because what that does is that provide some resistance and then you’ll take this you’ll Snug it down you’ll go to draw and then you’ll look at where your laser is your project.
Laser is in reference to your 20-yard pen and you’ll. Go through that process as well and you’ll. Do that a couple iterations and ultimately, the goal is to get your 20-yard pin into the black dot and then your projected laser into the open faith circle, and that will let you know that, where your pin is is where your your laser rangefinder and your visible laser appointing once you’ve done this process, you’re going to have to go back in and make sure shoot a couple arrows to make sure that your twenty are pin those adjustments that we made make sure that your 20-yard pin is still the impact of your arrow and where your twenty yard pin are are together, and so it may require a little bit of windage and elevation adjustment.
Once you make that windage and elevation adjustment just draw again check that your visible laser is still in line with with this site in paper. Now that we have that, ultimately, we were ready to shoot so the way that the site works on the site works by activation of the of the trigger, and so one click on the trigger will turn the site into standby mode and you’ll be able to tell that it’s in standby mode, because there’s no arrow on the bottom of the OLED screen, and so when you make a second click now once that second click is on, and you see that laser or excuse me that arrow.
That arrow is showing you that the laser rangefinder is now on scan mode, and so it will stay in scan mode for two minutes without without turning off at two minutes. It will auto back down into standby mode, and we just did that in the terms of functionality, so that there’s some battery conservation. So you don’t leave it on all day. Your trophy buck comes out, and lo and behold you don’t have a range finding a function. So if you hold the trigger down, it will shut the site back down so other features on it.
There is a sight light button on the side of it. There are four levels of brightness, so press it once two three four and then five is back off. It goes from low to high. So as you go through, if you’re in a blind super dark, something you know rate at end of shooting night light, and you need a little bit of pin help that will allow you to do so. The other feature about this is that the visible laser is removable, and so there are set screws on the bottom of it, and so once you’re done with the sight end process, you have the ability to take off the visible laser.
There are absolutely states that do not allow you to hunt with a projected laser so make sure that you check your local game laws and now your visible laser is off. So now you have a ready to hunt IQ defined sight. There are other features to it. There is second and third access adjustment. So, as you look here, there is some laser marks here and that will allow you to do your second access adjustment. Additionally, the level you can pitch the level so that with this fastener upfront and that will allow you to get your third access adjustment in line there are.
Additionally, there are clipper mounting holes here so that you can mount your quiver to your both side itself. So a lot of features packed into the IQ define it weighs in at just over 18 ounces. It is 5-pin site fully contained fibers, so that you’re not going to go through getting on your way to your stand or whatever you have 19 thousands fibers as well, and then you have a clear poly top to allow the maximum amount of light to illuminate your pins. Without the aid of the light retails for three 49 99 for more information, it can be found at WWI, cubo, sights calm.
IQ Bowsight Pro One Archery hunting bow sight
- SINGLE MOVEABLE PIN – Quickly move your pin with the rapid thread adjustment
- TOOL-FREE LOCKING KNOBS – Lock your windage and elevation positions in place without the use of any tools
- BUILT-IN SIGHT LEVEL – fully enclosed .019 fiber optic pin
- TWO DISTANCE MARKING TAPES – One visible at full draw in the bezel housing and the other located on the outside of the bezel housing
- MICRO ADJUST KNOBS – Quick and simple adjustment of the elevation and windage to precise positions using the adjustment markings – Right Handed
- hunting bow sight
- Manufacturer: IQ
- Brand: IQ
- Color: Black
- Item Dimensions LxWxH: 4.5 x 3.5 x 7.3 inches
- Sport Type: Hunting
- Material: Aluminum
- Type: hunting bow sight
CBE Tactic Hybrid 1-Pin hunting bow sight

From the name you trust in archery accessories, delivers features even the most demanding bowhunters need in a compact, light-weight, and versatile package.
- Smart-mount multi-positioning mounting holes
- Hybrid drive elevation adjustment with rapid stop
- Elevation gang adjustment with laser engraved markings
- Micro windage gang adjustment with laser engraved markings
- Ability to set a floating pin with a rapid stop
- Fiber management system for even brigter pins and better protection with 12″ of fiber
- Laser marked hashes for visual aid during pin adjustment
- hunting bow sight
- Product Dimensions: 4.5 x 3 x 9 inches; 12.06 Ounces
- Item model number: CBE-TCH-1-19
- Batteries: 1 Lithium Metal batteries required. (included)
- Manufacturer: CBE
- Type: hunting bow sight
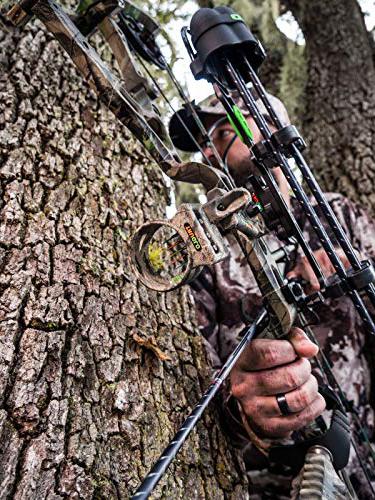
Hey guys, I’m sam with fall obsession I’m out here at cinnamon, creek archery today in north texas, shooting my bow on the 3d archery course. It’s texas, it’s hot, I’m sweaty! I apologize for that guys, but I wanted to take a few minutes to talk to you guys about the bow sight that I’m running this year, I’m shooting the cbe engage hybrid. This is an absolutely awesome sight. I shot it last year and then again this year. So I want to give you guys my thoughts on what makes this my site of choice.
First off. For me it’s about durability. I put these things through the ringer. Last year. Up in montana, we had six days of spot and stock pronghorn. This thing got drugged through the dirt, the mud, the weeds, the snow, all sorts of different conditions. It got beat up, and yet the adjustments held it never once got knocked off. It was tried and true the entire time, and that that says something to me if it can hold up in those conditions and under that kind of stress which it absolutely did it’s a metal design very durable.
Like I said, the adjustments hold very thick pins. It’s. It is a it’s a very well designed site designed for the bow hunter who is active and out there moving around next, for me is going to be the adjustability of the site and being able to specifically customize this site to me and how I shoot my bow, so the cbe engage hybrid offers the dovetail system, which is basically this bar right here that allows you to place the site farther away from your bow or closer to. However, you prefer whatever’s best for you.
It also has the second and third axis adjustments so that you can adjust your sight for when you’re shooting at elevated angles. Again, it’s just a tuning mechanism that allows you guys to specifically tune this thing into how you shoot. If you want more information on the second and third axis adjustment, we have another video on our youtube channel, specifically about adjusting the second and third axis on this site. So go check that out if you’re interested, it also has the micro adjustment capabilities for when you’re sighting in so, as you know, when you sight in your bow, your first adjustment, which is normally 20 yards, is going to be moving the entire housing.
So you have micro adjustment capabilities so that you can sight in without even using an allen key or anything and really fine tune that into exactly where it needs to be very small movements. The only thing that you would need an allen screw for sighting. This thing in are your individual pins. Those will take an allen screw, but everything else is adjustable based on just locks and knobs on the side itself. I can’t forget about your sight tape, which is what you use for long range shooting.
So the particular site that I have set up is a five pin sight, so I have it side in fixed pins for 20 through 60 yards. I put my sight tape on 60. I know that bottom pin is on 60 the second, that I turn this thing and start adjusting that on down to 70 80 90 100. That is what my bottom pin is at at that point, so that sight tape allows me to really stretch out my distance for those long range western shots on elk. Mule deer, like I said pronghorn, so this site is really built for somebody who is going to be shooting at those longer distances.
Finally, I’m going to talk about visualization. It has a very bright sight. Housing ring the bubble is very visible and your pins are very bright with the fibers looping around here on top of your housing. This way it holds light longer the more fiber that you have in there. You also do have a sight light if you choose to use it when shooting in low light conditions, but the visualization on this bow is very good. It’s very easy to pick up your pins. I personally went with a green red green red green instead of having a yellow in there.
That’s just something that I picked up from trial and error. Basically, I can’t see the color yellow as well on my target, so I go with green and red pins from that point on. So, if you’re struggling with something like that, that might be something to look into in changing the color of your pins but break it up. So you can tell the difference between the different distances. Again, I have a five pin sight here. A lot of guys run similar concepts to this or this exact same site. For that matter, with a three pin sight, it’s probably the most popular I went with the five pin, because the way I look at it, my target- that’s 60, yards or under, could potentially be moving pretty quickly and if I’m trying to shoot something farther than 60 yards, it’s going to need to be still enough for me to make that adjustment.
So those are some of my initial thoughts on the site. Those are some of the things that I particularly look for in a both side, and that really attracted me to this one. If you’re not in a long range shooting cbe does offer the same sight, build just without the adjustment tape or anything like that. So it’s just a three four five fixed pin sight, no long range adjustment capabilities, or anything like that. So again, if you want the sight, but you don’t want that option, you can get it without that option.
As far as the price point it’s on the higher end of the spectrum, I’m not gonna lie bow hunter to bow hunter, but it’s an investment. It’s how I look at it and it’s investment for a site that is going to stay on your boat for years to come, no matter what bow you have, so I encourage you guys to go check it out. The cbe engage, hybrid cbe makes awesome products in general, so go their website. Custombowequipment com see what they have see if they got a site. That’s right for you test it out.
Let me know if you got any questions drop them in the comments below thanks guys, you.
